
Easing is set to 0 by default.We can make our tweened objects start slowly and accelerate (easing in), or start quickly and decelerate (easing out). Easing runs on a scale of -100 t 0 for Easing In and from 0 to 100 for Easing Out.
How to apply Easing ?
1.Open a new movie
2.Using the Oval tool and a suitable gradient fill, create a small sphere.
3.Convert it in to a Graphic Symbol.
4.Place this ball at the top of our stage.
5.Now add key frames at 10 and 20.Now click on keyframe 10 and move the ball to the bottom of the stage.(Holding the shift key while moving the sphere will drop in a straight line).
Frame 1 : Top of the stage2.Using the Oval tool and a suitable gradient fill, create a small sphere.
3.Convert it in to a Graphic Symbol.
4.Place this ball at the top of our stage.
5.Now add key frames at 10 and 20.Now click on keyframe 10 and move the ball to the bottom of the stage.(Holding the shift key while moving the sphere will drop in a straight line).
Frame 10: Bottom of the stage
Frame 20:Top of the stage
6.Add a motion tween between frame 1 to 10 and then another between frames 10 to 20.

7.Select Key frame 1 and set the Easing on the properties window to -100(minus 100).We can do this with the slider or by keying the value in.This easing value will only apply to the first motion tween on the timeline.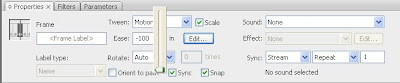
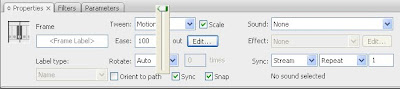
8.At key frame 10 set Easing out value to 100.This will make the ball slow down as it reaches the top of the bounce.
9.Test our movie.
Now Easing is applied to our movie.Enjoy the difference by with Easing and with out Easing.

7.Select Key frame 1 and set the Easing on the properties window to -100(minus 100).We can do this with the slider or by keying the value in.This easing value will only apply to the first motion tween on the timeline.

8.At key frame 10 set Easing out value to 100.This will make the ball slow down as it reaches the top of the bounce.

9.Test our movie.
Now Easing is applied to our movie.Enjoy the difference by with Easing and with out Easing.
Note : Ease in to speed up , Ease out to Slow down

No comments:
Post a Comment