

A Good Beginning Is Half Done
Sunday, October 31, 2010

Thursday, October 28, 2010
Thought for the Day - Always bear in mind ...

“Always bear in mind that your own resolution to succeed is more important than any one thing.”
Abraham Lincoln
Wednesday, October 27, 2010

Tuesday, October 26, 2010
Thought for the Day - Time is what we ...

Time is what we want most but what we use worst.
William Penn
William Penn
Monday, October 25, 2010
Thought for the Day - Your greatest...

Your greatest resource is your time.
Brian Tracy
Brian Tracy
Sunday, October 24, 2010
Thought for the Day - Be Happy...
 Be HAPPY and make others HAPPY
Thursday, October 21, 2010

Tuesday, October 19, 2010
Thought for the Day - If we open a quarrel...
 If we open a quarrel between past and present,
we shall find that we have lost the future.
Winston Churchill
Thought for the Day - Attitude is a ...

Attitude is a little thing that makes a big difference.
Winston Churchill
Winston Churchill
Friday, October 15, 2010
Rectangular Marquee Tool - Photoshop Tools


The Rectangular Marquee Tool Marquee Tool creates Rectangular Marquee Tool selections.

There are four modes associated with Rectangular Marquee Tool .
Four modes
* Create new selection
* Add to shape area - to To add an area to the existing selection .
* Subtract from shape area - to subtract from the existing selection
* Intersect with shape area - to intersect new selection with existing one.
 Style
StyleNormal
Fixed Aspect Ratio -To create an Rectangular selection with predefined proportions
Fixed Size style-To create an Rectangular selection with predefined size
Feather:
The Feather option gives a nice soft edge around the selected area. The softness depends on the amount of feather we give.
Tips:
If we press the shift key While creating new selection we can get square shaped selection
Elliptical Marquee Tool -Photoshop Tools

The Elliptical Marquee Tool creates elliptical selections.
There are four modes associated with Elliptical Marquee Tool.
Four modes
* Create new selection
* Add to shape area - to To add an area to the existing selection .
* Subtract from shape area - to subtract from the existing selection
* Intersect with shape area - to intersect new selection with existing one.
StyleNormal
Fixed Aspect Ratio -To create an elliptical selection with predefined proportions
Fixed Size style-To create an elliptical selection with predefined size
Feather:
The Feather option gives a nice soft edge around the selected area. The softness depends on the amount of feather we give.
Tips:
If we press the shift key While creating new selection we can get circle shaped selection
Thursday, October 14, 2010
HTML - Image Tag
We can include images in our Web page through <img> tag.The image tag is an empty tag.
The Attributes of <img> tag are listed below.
SRC (file or"URL")-It specifies the location of the image.
ALT("text")-It specifies the text,which would be displayed ,if the browser does not support
graphics.
ALIGN(TOP,MIDDLE,or BOTTTOM)-It aligns the text according to the specified position.
Syntax for defining an image:
<img src="url" alt="some_text"/>
Example:
<html>
<body>
<img src="http://qualitypointtech.net/images/services.gif" alt="www.qualitypointtech.com"
width="104" height="142" />
</body>
</html>
Thought for the Day - Loneliness and the ...
 Loneliness and the feeling of being unwanted is the
most terrible poverty.
Mother Teresa
Mother Teresa
Wednesday, October 13, 2010
Thought for the Day - Anyone who...

Anyone who doesn't take truth seriously in small matters
cannot be trusted in large ones either.
Albert Einstein
cannot be trusted in large ones either.
Albert Einstein
Tuesday, October 12, 2010
Thought for the Day - Everything ...
 Everything should be as simple as it is, but not simpler.
Albert Einstein
Monday, October 11, 2010
Thought for the Day - Being ignorant is...
 Being ignorant is not so much a shame, as being unwilling to learn.
Benjamin Franklin
How to change the Background of an image with another image?

1.First we need to open a new file
File --> New or (ctrl+n).
2.Place a picture in this layer.
i am going to place a Tajmahal here.
3.Select the Magic Wand Tool.
4.Using this Tool click the background of an image the entire background will be selected.

5.Select--.Inverse or shift+Ctrl+I

6.Ctrl + J (New Layer Via Copy) — Can be used to duplicate the active layer into a new layer.

7.Next, I am going to open the image I want to replace the original sky with.
a.I'll press Ctrl+A to select the entire new image
b.Ctrl+c to the image we are to place it as a background image.
8.select the Layer 1 ie theoriginal image
9.Ctrl+v to paste the new image.Then only it will appear between our existing two layers.

Magic Wand Tool ( M ) - Photoshop Tools
 | M |
The Magic Wand Tool selects pixels based on tone and color. similarly colored areas
Anti-aliased - It is set by default.It will be used to give some slight blur effect/smoothness to our selection.
Contiguous - It will select similarly colored areas in all visible layers.
Tolerance - If we set higher value wide area will be selected.
Sample All Layers- It's unchecked by default.It will include all the layers based on our selection.
Modes:
There are four modes associated with Magic Wand Tool.
* Create new selection
* Add to selection - to To add an area to the existing selection .
* Subtract from selection - to subtract from the existing selection
* Intersect with selection - to intersect new selection with existing one.
Sunday, October 10, 2010
Thought for the Day - A small leak..
 A small leak can sink a great ship.
Benjamin Franklin
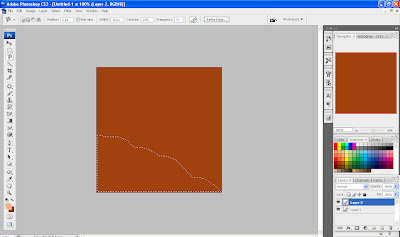
How to Design a Sunny Rays Background?
1.First we need to open a new file
File --> New or (ctrl+n).
2.select the Paint Bucket Tool to paint the background.
I have selected this color #a0410d
3.Create a new layer
4.Using the Magnetic Lasso Tool Draw this shape.
5.In this selected area apply some designs.

a. Select the custom Brush tool.Here choose Falling Ivy Leaves brush preset.Using this brush
put some leaves.
b. Select the custom shape tool.Here choose leaf.Using this draw some leaves.
c. Select the custom shape tool.Here choose grass.Using this draw some grasses.
6.Ctrl+D to select the selection made by the Magnectic Lasoo Tool.
7.Create a new layer for designing a sun.
8.Select the Ellipse tool and in style selection i have selected Yellow gel with drop shadow
effect.Draw circle using this.
9.Create a new layer for creating Rays from the sun.
10.Using the Polygonal Lasso Tool create rays.
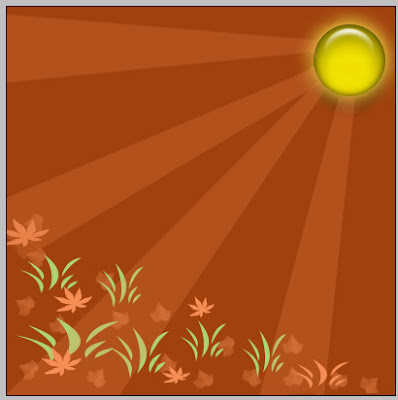
11.Right click on the rays and choose the color what we want.
12.Set the opacity to 20%
13.Ctrl+D to select the selection made by the Polygonal Lasso Tool.
13.Create a new layer.
In this layer I have placed plants,trees and butterflies.
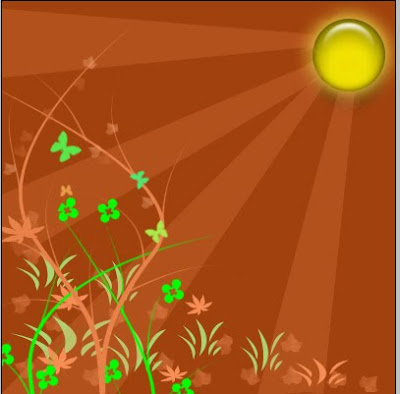
14.Create a new layer for putting your favorite quote.
select the text tool and type your favorite quote.

File --> New or (ctrl+n).
2.select the Paint Bucket Tool to paint the background.
I have selected this color #a0410d
3.Create a new layer
4.Using the Magnetic Lasso Tool Draw this shape.

5.In this selected area apply some designs.

a. Select the custom Brush tool.Here choose Falling Ivy Leaves brush preset.Using this brush
put some leaves.
b. Select the custom shape tool.Here choose leaf.Using this draw some leaves.
c. Select the custom shape tool.Here choose grass.Using this draw some grasses.
6.Ctrl+D to select the selection made by the Magnectic Lasoo Tool.
7.Create a new layer for designing a sun.
8.Select the Ellipse tool and in style selection i have selected Yellow gel with drop shadow
effect.Draw circle using this.
9.Create a new layer for creating Rays from the sun.
10.Using the Polygonal Lasso Tool create rays.

11.Right click on the rays and choose the color what we want.
12.Set the opacity to 20%
13.Ctrl+D to select the selection made by the Polygonal Lasso Tool.
13.Create a new layer.
In this layer I have placed plants,trees and butterflies.

14.Create a new layer for putting your favorite quote.
select the text tool and type your favorite quote.

Friday, October 8, 2010
Thought for the Day - Attitude is a little...

Attitude is a little thing that makes a big difference.
Winston Churchill
Winston Churchill
Thursday, October 7, 2010
Thought for the Day - A Penny saved...

A penny saved is a penny earned.
Benjamin Franklin
Benjamin Franklin
Thought for the Day - Better three hours...
 Better three hours too soon than a minute too late.
William Shakespeare
Tuesday, October 5, 2010
Thought for the Day - listen to ...

Listen to many, speak to a few.
William Shakespeare
William Shakespeare
Monday, October 4, 2010
Thought for the Day - Peace begins...
 Peace begins with a smile.
Mother Teresa
HTML - Links
Hyperlink is used to create links within the same document and also to documents present
elsewhere on the Web.For hyperlink we have to use <a> tag.
Using Hyperlink we can link
1.Linking within the same document (by using the name attribute)
2.Linking one document to another (by using the href attribute)
3.linking non-text objects (Linking audio,video,image or other multimedia file)
1.Create the link where we want
<a href=#btm>Bottom</a>
2.Using the name attribute specify the place where we have to go after clicking the link.
<a name=btm>
Example:
<html>
<head>
<title>Hyperlink</title>
<a href=#btm>Bottom</a>
<a name=tp>
<p>A hyperlink (or link) is a word, group of words, or image that you can click on to
jump to a new document or a new section within the current document.</p>
<a name=btm>
<p>1.Linking within the same document (byusing the name attribute)
2.Linking one document to another (by using the href attribute)
3.linking non-text objects (Linking audio,video,image or other multimedia file)
</p>
<a href=#tp>Top</a>
<body>
Syntax:<a href="url">Link text</a>
Example:
<html>
<head>
<body>
<a href=http://www.youcanstart.blogspot.com/>Welcome to You can Start</a>
</body>
</html>
elsewhere on the Web.For hyperlink we have to use <a> tag.
Using Hyperlink we can link
1.Linking within the same document (by using the name attribute)
2.Linking one document to another (by using the href attribute)
3.linking non-text objects (Linking audio,video,image or other multimedia file)
Linking within the same document
Steps:1.Create the link where we want
<a href=#btm>Bottom</a>
2.Using the name attribute specify the place where we have to go after clicking the link.
<a name=btm>
Example:
<html>
<head>
<title>Hyperlink</title>
<a href=#btm>Bottom</a>
<a name=tp>
<p>A hyperlink (or link) is a word, group of words, or image that you can click on to
jump to a new document or a new section within the current document.</p>
<a name=btm>
<p>1.Linking within the same document (byusing the name attribute)
2.Linking one document to another (by using the href attribute)
3.linking non-text objects (Linking audio,video,image or other multimedia file)
</p>
<a href=#tp>Top</a>
<body>
Linking one document to another
Syntax:<a href="url">Link text</a>
Example:
<html>
<head>
<body>
<a href=http://www.youcanstart.blogspot.com/>Welcome to You can Start</a>
</body>
</html>
Sunday, October 3, 2010
HTML - Blink Tag
The blink tag is used to Flash the text .
Example :
<html>
<head>
<body>
<blink>Welcome</blink>
</body>
</html>
Example :
<html>
<head>
<body>
<blink>Welcome</blink>
</body>
</html>
HTML - Marquee Tag
Marquee tag enables to create the scrolling text.Attributes involved in this tag are.
Bgcolor - Background color behind the text.
Behavior-Determines how the text scrolls.Different values for this attribute are alternate,scroll and slide.
Direction-This attribut determines direction of text scroll.The possible directions are left,right,bottom and top.
Loop-Determines the number of times the marquee text will scroll.
Scrollamount-Determines the amount of pixels the text scrolls between each drawing of the marquee.
Scrolldelay-It is used to set the number of milliseconds between each rendering of the scrolled message.
Title-This attribute is used to provide advisory information.
Example :
<html>
<head>
<title>MARQUEE</title>
</head>
<body>
<Marquee bgcolor=pink behavior="alternative" direction="right" loop="6" scrollamount="10"
scrolldelay="10" title="welcome to Marquee world">Welcome to Qualitypoint
Technologies</Marquee>
</body>
</html>
HTML - Style ( FONT ,Background color ,Alignment)
HTML styles, styles can be added to HTML elements directly by using the style attribute, or indirectly in separate style sheets (CSS files).
Example 1:
<html>
<body style="background-color:yellow">
<h2 style="background-color:red">BACK GROUND</h2>
<p style="background-color:green">WELCOME.</p>
</body>
</html>
Example 2:
<html>
<body>
<h1 style="font-family:verdana">FONT</h1>
<p style="font-family:arial;color:red;font-size:20px;">WELCOME.</p>
</body>
</html>
Example 3:
<html>
<body>
<h1 style="text-align:center">TEXT ALIGNMENT</h1>
<p>WELCOME.</p>
</body>
</html>
| Attribute | Description |
|---|---|
| font-size | Specifies font size. Example: font-size:20px; |
| color: | Specifies font color. color:red; |
| font-family: | Sets the current fonts typeface. Example:font-family:arial; |
| background-color | background-color property defines the background color for an element Example:background-color:green |
| text-align | text-align property specifies the alignment(center,left,right) of text in an element Example:text-align:center |
Example 1:
<html>
<body style="background-color:yellow">
<h2 style="background-color:red">BACK GROUND</h2>
<p style="background-color:green">WELCOME.</p>
</body>
</html>
Example 2:
<html>
<body>
<h1 style="font-family:verdana">FONT</h1>
<p style="font-family:arial;color:red;font-size:20px;">WELCOME.</p>
</body>
</html>
Example 3:
<html>
<body>
<h1 style="text-align:center">TEXT ALIGNMENT</h1>
<p>WELCOME.</p>
</body>
</html>
Friday, October 1, 2010
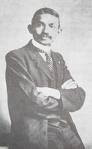
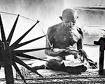
Mahathma Gandhi

Mahatma Gandhi was born on October 2, 1869 in Porbandar, Gujrat, India.
His full name was Mohandas Karamchand Gandhi.Gandhiji Also Knowan As Father of India.
His father is Karamchand Gandhi and his mother is Putlibai.
In May 1883, 13-year old Mohandas was married 14-year old Kasturbai Makhanji.
Gandhi studied law in England from 1888 to 1891.He came to Mumbai to practice law.
Gandhi moved to South Africa in 1893.Gandhi remained in South Africa for 20 years.
The small Indian community in South Africa was facing many problems at that time.
White Rulers imposed many restrictions and heavy taxes on the Indians. They were not given
citizenship rights, like right to vote.
Gandhi began to feel the racial iscrimination in South Africa.He fought for the people.He used
Satyagraha.("Satyagraha means asserting truth through non-violence").Indian demands were accepted.
Gandhi returned to India in January 1915.Gandhi led the Congress for a period of 25 years.In
India,he fought for India's freedom against British.Here also he used Sathyagraha. So many times he was arrested and prisoned.The Salt Satyagraha,‘Quit India’ Movement are took place under the leadership of Gandhi.
On January 30, 1948, Gandhi was shot by Nathu Ram Godse.
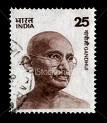
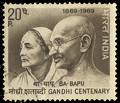
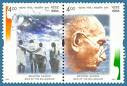
Indian Government Declared October 2nd as a National Holiday for India.Indian Government published so many stamps in memory of Gandhi.

Google's Doodle for Gandhi
Oct 2, 2009

His full name was Mohandas Karamchand Gandhi.Gandhiji Also Knowan As Father of India.
His father is Karamchand Gandhi and his mother is Putlibai.
In May 1883, 13-year old Mohandas was married 14-year old Kasturbai Makhanji.

Gandhi studied law in England from 1888 to 1891.He came to Mumbai to practice law.
Gandhi moved to South Africa in 1893.Gandhi remained in South Africa for 20 years.
The small Indian community in South Africa was facing many problems at that time.
White Rulers imposed many restrictions and heavy taxes on the Indians. They were not given
citizenship rights, like right to vote.
Gandhi began to feel the racial iscrimination in South Africa.He fought for the people.He used
Satyagraha.("Satyagraha means asserting truth through non-violence").Indian demands were accepted.

Gandhi returned to India in January 1915.Gandhi led the Congress for a period of 25 years.In
India,he fought for India's freedom against British.Here also he used Sathyagraha. So many times he was arrested and prisoned.The Salt Satyagraha,‘Quit India’ Movement are took place under the leadership of Gandhi.
On January 30, 1948, Gandhi was shot by Nathu Ram Godse.
Indian Government Declared October 2nd as a National Holiday for India.Indian Government published so many stamps in memory of Gandhi.
Stamps


Google's Doodle for Gandhi
Oct 2, 2009

Gandhi's Famous Quotes


Subscribe to:
Posts (Atom)