
A Good Beginning Is Half Done
Monday, January 31, 2011


Custom Shape Tool - Photoshop Tools

With the help of Custom Shape Tool, we can draw pre defined shapes of any size. We can also draw shape with perfect dimentions.We are having many different pre-defined shapes.
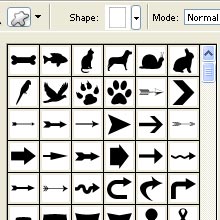
How to use the Custom Shape Tool:
1.Select the Custom Shape Tool.
2.Predefined shapes palatte will be opened.
3.Select the shape what ever you you want
4.Click and Drag on the image.

From Center - Used to draw the image from center.
Drawing modes:2.Predefined shapes palatte will be opened.
3.Select the shape what ever you you want
4.Click and Drag on the image.
From Center - Used to draw the image from center.
- Un Constrained - According to our taste we can draw Custom Shape.
- Defined Proportions - We can't specify how the width and height will proportional to each other.
- Defined size- What is default size will be taken
- Fixed Size - Using this option we can specify the height and width of the shape.Here size of the shape is fixed ie what we specified previously.

To create vector shape layers click Shape layers button
To draw paths (shape outlines) click Paths button
To create rasterized shapes in current layer click Fill pixels
Options:

- Create new shape layer - to create every new shape in a separate layer
- Add to shape area - to create multiple shapes in the same vector shape layer.
- Subtract from shape area - to subtract shapes from the current shape layer.
- Intersect with shape area - to intersect new shapes with existing one in the same layer.
- Exclude overlapping shape areas - to subtract overlapping areas.
Sunday, January 30, 2011
Thought for the Day - You cant demand respect unless you....

You cant demand respect unless you respect yourself FIRST.
Friday, January 28, 2011
Thought for the Day - Bad habits are like a ...

Bad habits are like a comfortable bed, easy to get into, but hard to get out of.
Thursday, January 27, 2011
Thought for the Day - Even the weak become strong When ...

Even the weak become strong when they are united.
Wednesday, January 26, 2011
Thought for the Day - You have to dream before your...

You have to dream before your dreams can come true.
Abdul Kalam
Sunday, January 23, 2011
Thought for the Day - Happiness is nothing more than ...

Happiness is nothing more than good health and a bad memory.
Friday, January 21, 2011
Thought for the Day - Loneliness and the feeling of ...

Loneliness and the feeling of being unwanted is the most terrible poverty.
Mother Teresa
Mother Teresa
Magnetic Lasso Tool ( L ) - Photoshop Tools

How to use this tool?
1.Select the Magnetic Lasso Tool
2.Click somewhere along the edge of the object or area you need to select.
3.Continue moving around the object or area by adding a new point. How to finish the selection?
1.Clicking once again on the starting point you have added.
2.You can finish the selection by double-click
Four modes
* Create new selection
* Add to selection - To add an area to the existing selection .
* Subtract from selection -To subtract from the existing selection
* Intersect with selection - To intersect new selection with existing one.
* Create new selection
* Add to selection - To add an area to the existing selection .
* Subtract from selection -To subtract from the existing selection
* Intersect with selection - To intersect new selection with existing one.
Feather:
The Feather option gives a nice soft edge around the selected area. The softness depends on the amount of feather we give.
The Feather option gives a nice soft edge around the selected area. The softness depends on the amount of feather we give.
Options:
Width :
Width options allows you to change the number of pixels the magnetic lasso tool takes into account for finding contrast.Use a large pixel value for high contrast areas and a lower pixel value for tight low contrast areas.
While using the Magnetic lasso tool we can't change the number of pixels in this box.In this situation press the square bracket key ] to increase and [ to decrease the width.
Contrast :
This option determines how much of a difference there must be in color or brightness value between the object and its background to find out the edge.Use a large contrast value for high contrast areas and a lower contrast value for tight low contrast areas.
While using the Magnetic lasso tool we can't change the contrast directly in this box.In this situation
press the period key ( . ) on your keyboard to increase the contrast value or the comma ( , ) to decrease it.
Frequency :
This tool will automatically place anchor points with some default distance between the points.If we want to increase/decrease the space between the anchor points using this option we can change it.
Polygonal Lasso Tool ( L ) - Photoshop Tools

Polygonal Lasso Tool is Similar to the lasso tool.It will be used to create polygonal selections.Polygonal Lasso Tool can only straight-sided selections only.

How to use this tool?
1.Select the Polygonal tool.
2.Click somewhere along the edge of the object or area you need to select.
3.Continue moving around the object or area by adding a new point.
How to finish the selection?
1.Clicking once again on the starting point you have added.
2.You can finish the selection by double-click

Four modes
* Create new selection
* Add to selection - To add an area to the existing selection .
* Subtract from selection -To subtract from the existing selection
* Intersect with selection - To intersect new selection with existing one.
Feather:
The Feather option gives a nice soft edge around the selected area. The softness depends on the amount of feather we give.
Tips:
1.Holding shift while clicking with the polygonal lasso tool creates straight lines and 45 degree angles.
2. If you make a mistake while adding a point Just press the Backspace the previous point will be deleted.
Is it possible to Switch Between The Polygonal Lasso Tool and the Lasso Tool?
Yes, it is possible to Switch Between The Polygonal Lasso Tool and the Lasso Tool.
While using the Polygonal Lasso Tool hold down the ALT key this temporarily switches you to the Lasso Tool release your Alt key, then release your mouse button You'll switch back to the Polygonal Lasso Tool.
While selecting straight lined image if u want to select curved portion this switching facility will be very useful.
Thursday, January 20, 2011
Lasso Tool ( L ) - Photoshop Tools

The Lasso Tool is a free selection tool.
With the Lasso Tool we can click and then drag to draw any shape selection that you want; if we release the mouse, the shape will automatically close itself by connecting the open ends with a line, or we can connect the ends ourself by dragging all the way to our starting point.
* Create new selection
* Add to selection - To add an area to the existing selection .
* Subtract from selection -To subtract from the existing selection
* Intersect with selection - To intersect new selection with existing one.
Feather:
The Feather option gives a nice soft edge around the selected area. The softness depends on the amount of feather we give.
Thought for the Day - Focused action ...

Focused action beats brilliance.
Mark Sanborn
Mark Sanborn
Wednesday, January 19, 2011
How to design a table using CSS?
Example 1:
table.main {
border:5px solid;
border-color: blue;
}
td.column1 {
border: 1px solid;
border-color: black;
background-color:pink;
color: #0000EE;
padding: 24px 12px 24px 4px;
}
td.default {
border: 1px solid;
border-color: #000000;
padding: 24px 12px 24px 4px;
background-color: #FFFFFF;
color: #000000;
}
td.highlight {
border: 1px solid;
border-color: red;
padding: 24px 12px 24px 4px;
background-color: #FFFF00;
color: #000000;
}
Title Row 1 | data, data, data... | data, data, data... |
Title Row 2 | data, data, data... | data, data, data... |
Title Row 3 | data, data, data... | data, data, data... |
Example:2
<table>
<head>
<style type="text/css">
</head>
<body>
table, td, th
{
border:1px solid red;
}
th
{
background-color:pink;
color:white;
}
</style>
<table><tbody>
<tr> <th>RollNo</th> <th>Name</th> <th>Result</th> </tr>
<tr> <td>A1</td> <td>Agna</td> <td>Pass</td> </tr>
<tr> <td>A2</td> <td>Amutha</td> <td>Fail</td> </tr>
<tr> <td>A3</td> <td>Bavithra</td> <td>Pass</td> </tr>
<tr> <td>A4</td> <td>Cathy</td> <td>Pass</td> </tr>
</tbody></table>
</body>
</html>
| RollNo | Name | Result |
|---|---|---|
| A1 | Agna | Pass |
| A2 | Amutha | Fail |
| A3 | Bavithra | Pass |
| A4 | Cathy | Pass |
Example:3
Creating table using CSS and Divhtml>
<head>
<title></title>
<style type="text/css">
.tablediv {
display: table;
width:600px;
background-color:lightgreen;
border:3px solid blue;
border-spacing:10px;
border-collapse:separate;
}
.celldiv {
float:left;
display: table-cell;
width:50%;
background-color:pink;
}
.rowdiv {
display: table-row;
width:auto;
background-color:yellow;
}
</style>
</head>
<body>
<div class="tablediv">
<div class="rowdiv">
<div class="celldiv">Flowers</div>
<div class="celldiv">Fruits</div>
</div>
<div class="rowdiv">
<div class="celldiv">Rose</div>
<div class="celldiv">Apple</div>
</div>
</div>
</body>
</html>
Flowers
Fruits
Rose
Apple
Thought for the Day - If you want people...

If you want people to trust you be trustworthy
– Steven Covey
Tuesday, January 18, 2011
Thought for the Day - Don't compare yourself...

Don't compare your self with anyone if you do you are insulting yourself.
Thursday, January 13, 2011
Thought for the Day - Believing everyone is...

Believing everyone is dangerous, believing no one is very dangerous
Wednesday, January 12, 2011
Thought for the Day - Don't ask for a ...

Dont ask for a lighter load, pray for a stronger shoulder
Tuesday, January 11, 2011
Thought for the Day - If you win you ...

If you win you need not explain, but if you lose you shouldn’t be there to explain
– Adolph Hitler
Monday, January 10, 2011
Thought for the Day - If we can ...

If we cannot love the person whom we can see, how can we love God whom we cannot see
– Mother Teresa
Sunday, January 9, 2011
Thought for the Day - Every one thinks .....

Everyone thinks of changing the world, but no one is willing to make a start by changing himself
Friday, January 7, 2011
Thought for the Day - Never Say Never

Never Say Never
Thursday, January 6, 2011
Thought for the Day - Arise!Awake!...

Arise ! Awake ! Stop not till goal is reached
Wednesday, January 5, 2011
Thought for the Day - Give me ...

"Give me 6 hours to chop down a tree and I will spend the first 4 hours sharpening the axe.”
– Abraham Lincoln
Tuesday, January 4, 2011
Thought for the Day - Conquer yourself first ....

Conquer yourself first and then you will conquer the world.
Sunday, January 2, 2011
Thought for the Day - The more we come out ...

The more we come out and do good to others,
the more our hearts will be purified,
and God will be in them .
Swami Vivekananda
Subscribe to:
Posts (Atom)