We can easily find out whether an object is part of a group or not.If the object is a part of group means thin colored highlighting line will appear around the outer edges of grouped objects.Default color is pale blue.If we want we can change the settings.
To change the default color settings:
1.In menu select
Edit-->Preferences
2.Select the General Tab
3.In Highlight color option Select Use this color button
Change the color according to our taste
4.Click Ok

A Good Beginning Is Half Done
Friday, July 30, 2010

Is it possible to edit group of objects? - Grouping
Yes we can edit a group of objects.
1.In menu select
Edit-->Edit selected
OR
Double click on our group
2.Now we can see some changes on our time line.Group icon is appearing next to scene.
3.In Edit group mode we can do changes
4.To return to the main stage click Scene1 button
Now we are back on the main stage.
1.In menu select
Edit-->Edit selected
OR
Double click on our group
2.Now we can see some changes on our time line.Group icon is appearing next to scene.
3.In Edit group mode we can do changes
4.To return to the main stage click Scene1 button
Now we are back on the main stage.
How to Ungroup the objects? - Grouping
1.Select the objects with the arrow tool
2.In menu select
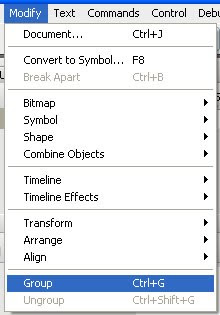
Modify-->Ungroup
Our objects are UnGrouped.
Now if we move an object the particular object alone will move.
2.In menu select
Modify-->Ungroup
Our objects are UnGrouped.
Now if we move an object the particular object alone will move.
How to group multiple objects?-Grouping
1.Open a new movie
2.Using the rectangle tool draw rectangle on the stage.Now select the oval tool and draw a circle.
3.Now select the objects using Arrow tool.In menu bar select
Modify-->Group
Our objects rectangle and circle are grouped.
Now if we move one object the other will move with it.It will be more useful when we are using large number of objects.
Grouping Objects - Flash
Grouping is an easy way to organize and manipulate objects.We can group lines,fills,buttons,graphics,movies clips and text.It will help to maintain the design and look and feel of our movie.Using this option we can handle large number of objects.
How to group multiple objects?
How to Ungroup the objects?
Is it possible to edit group of objects?
How to find out whether an object is a part of a group or not?
How to group multiple objects?
How to Ungroup the objects?
Is it possible to edit group of objects?
How to find out whether an object is a part of a group or not?
Tuesday, July 27, 2010
How to create Fading with Tint- Motion Tweening Effect?
How to create Motion Tweening Effect - Fading with Alpha?
1.Create a symbol.
Choose Insert > New Symbol in the menu (or press Ctrl+F8).
2.A Symbol Properties box appears.
Enter a name for the symbol.
Select the "graphic" option.
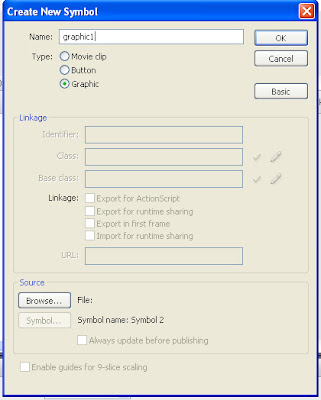
Click OK.Now we are taken to the symbol creator in Flash.
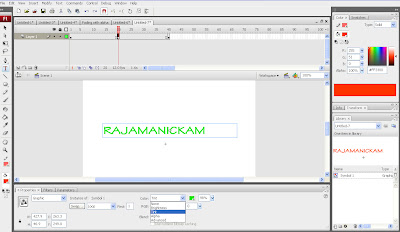
3.Using the Text tool and enter some text
4.To exit the symbol generator and return to our movie
click the scene icon in the upper left corner:

5.Open Library
Window-->Library or Ctrl+L.
6.Drag drop our symbol on the stage
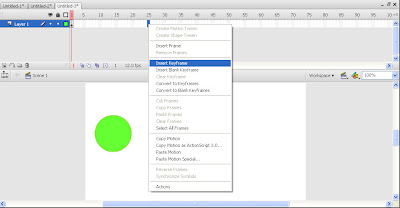
7.In the timeline insert a keyframe at frame 15 and 30
Right click on the time line -->Insert key frame OR F6
8.Select frame 15.Right click the symbol on the stage.
An Instance Properties box appears.
Choose: Color Effect.
In the "Color Effect" drop-down box choose "Tint".
9.Add motion tweening to keyframe 1 and keyframe 15.
10.Add motion tweening to keyframe 15 and keyframe 30.
Fading with Tint is created.
We can add Fading with Tint effects to any object(text,hand drawn and image).
But the object must be converted to a symbol.
1.Create a symbol.
Choose Insert > New Symbol in the menu (or press Ctrl+F8).
2.A Symbol Properties box appears.
Enter a name for the symbol.
Select the "graphic" option.

Click OK.Now we are taken to the symbol creator in Flash.
3.Using the Text tool and enter some text
4.To exit the symbol generator and return to our movie
click the scene icon in the upper left corner:

5.Open Library
Window-->Library or Ctrl+L.
6.Drag drop our symbol on the stage
7.In the timeline insert a keyframe at frame 15 and 30
Right click on the time line -->Insert key frame OR F6
8.Select frame 15.Right click the symbol on the stage.
An Instance Properties box appears.
Choose: Color Effect.
In the "Color Effect" drop-down box choose "Tint".

9.Add motion tweening to keyframe 1 and keyframe 15.
10.Add motion tweening to keyframe 15 and keyframe 30.
Fading with Tint is created.
We can add Fading with Tint effects to any object(text,hand drawn and image).
But the object must be converted to a symbol.
How to How to Create Fading with Alpha - Motion Tweening Effect?
How to create Motion Tweening Effect - Fading with Alpha?
1.Create a symbol.
Choose Insert > New Symbol in the menu (or press Ctrl+F8).
2.A Symbol Properties box appears.
Enter a name for the symbol.
Select the "graphic" option.
Click OK.Now we are taken to the symbol creator in Flash.
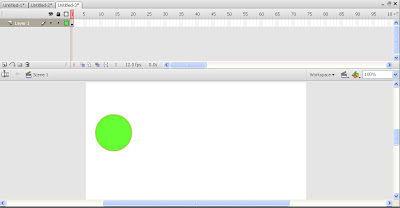
3.Using the Oval tool and a suitable gradient fill, create a small sphere.
4..Group the circle's fill and outline.
Modify-->Group
5.To exit the symbol generator and return to our movie
click the scene icon in the upper left corner:
6.Open Library
Window-->Library or Ctrl+L.
7.Drag drop our symbol on the stage
8.In the timeline insert a keyframe at frame 15 and 30
Right click on the time line -->Insert key frame OR F6
9.Select frame 15.Right click the symbol on the stage.
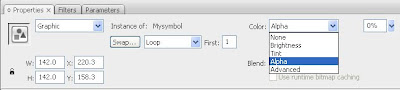
An Instance Properties box appears.
Choose: Color Effect.
In the "Color Effect" drop-down box choose "Alpha" and then set the Alpha Slider to 0%.This will make the symbol instance completely transparent in the key frame at frame 15.
10.Add motion tweening to keyframe 1 and keyframe 15.
11.Add motion tweening to keyframe 15 and keyframe 30.
Fading with Alpha is created.
We can add Fading with alpha effects to any object(text,hand drawn and image).
But the object must be converted to a symbol.
1.Create a symbol.
Choose Insert > New Symbol in the menu (or press Ctrl+F8).
2.A Symbol Properties box appears.
Enter a name for the symbol.
Select the "graphic" option.
Click OK.Now we are taken to the symbol creator in Flash.
3.Using the Oval tool and a suitable gradient fill, create a small sphere.
4..Group the circle's fill and outline.
Modify-->Group
5.To exit the symbol generator and return to our movie
click the scene icon in the upper left corner:
6.Open Library
Window-->Library or Ctrl+L.
7.Drag drop our symbol on the stage
8.In the timeline insert a keyframe at frame 15 and 30
Right click on the time line -->Insert key frame OR F6
9.Select frame 15.Right click the symbol on the stage.
An Instance Properties box appears.
Choose: Color Effect.
In the "Color Effect" drop-down box choose "Alpha" and then set the Alpha Slider to 0%.This will make the symbol instance completely transparent in the key frame at frame 15.

10.Add motion tweening to keyframe 1 and keyframe 15.
11.Add motion tweening to keyframe 15 and keyframe 30.
Fading with Alpha is created.
We can add Fading with alpha effects to any object(text,hand drawn and image).
But the object must be converted to a symbol.
Monday, July 26, 2010
Easing - Motion Tweening
Easing feature on motion tweens to make an object move more naturally. Easing is essentially a way of controlling the apparent acceleration and deceleration of the motion - tweened object.
Easing is set to 0 by default.We can make our tweened objects start slowly and accelerate (easing in), or start quickly and decelerate (easing out). Easing runs on a scale of -100 t 0 for Easing In and from 0 to 100 for Easing Out.
How to apply Easing ?
Frame 10: Bottom of the stage
Frame 20:Top of the stage
Easing is set to 0 by default.We can make our tweened objects start slowly and accelerate (easing in), or start quickly and decelerate (easing out). Easing runs on a scale of -100 t 0 for Easing In and from 0 to 100 for Easing Out.
How to apply Easing ?
1.Open a new movie
2.Using the Oval tool and a suitable gradient fill, create a small sphere.
3.Convert it in to a Graphic Symbol.
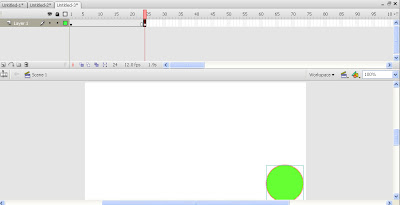
4.Place this ball at the top of our stage.
5.Now add key frames at 10 and 20.Now click on keyframe 10 and move the ball to the bottom of the stage.(Holding the shift key while moving the sphere will drop in a straight line).
Frame 1 : Top of the stage2.Using the Oval tool and a suitable gradient fill, create a small sphere.
3.Convert it in to a Graphic Symbol.
4.Place this ball at the top of our stage.
5.Now add key frames at 10 and 20.Now click on keyframe 10 and move the ball to the bottom of the stage.(Holding the shift key while moving the sphere will drop in a straight line).
Frame 10: Bottom of the stage
Frame 20:Top of the stage
6.Add a motion tween between frame 1 to 10 and then another between frames 10 to 20.

7.Select Key frame 1 and set the Easing on the properties window to -100(minus 100).We can do this with the slider or by keying the value in.This easing value will only apply to the first motion tween on the timeline.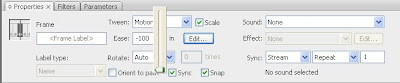
8.At key frame 10 set Easing out value to 100.This will make the ball slow down as it reaches the top of the bounce.
9.Test our movie.
Now Easing is applied to our movie.Enjoy the difference by with Easing and with out Easing.

7.Select Key frame 1 and set the Easing on the properties window to -100(minus 100).We can do this with the slider or by keying the value in.This easing value will only apply to the first motion tween on the timeline.

8.At key frame 10 set Easing out value to 100.This will make the ball slow down as it reaches the top of the bounce.

9.Test our movie.
Now Easing is applied to our movie.Enjoy the difference by with Easing and with out Easing.
Note : Ease in to speed up , Ease out to Slow down
Rotation - Motion Tween
1.On the stage draw circle.
2.Group the circle's fill and outline.
Modify-->Group
3.In the timeline insert a keyframe at frame 24
Right click on the time line -->Insert key frame
OR
F6
4.Move the grouped object(Cirlcle) to the right hand side of the stage at frame 24.
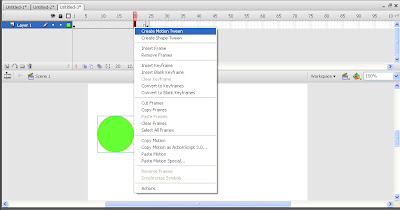
5.Now go back to the line and Right Click on any Frame between 1 and 24.
6.Click -->Create Motion Tween.
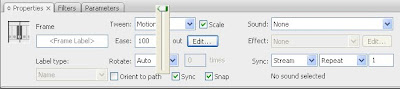
7.Click on the Rotate options on the properties window
 Here there are three options
a.Auto
b.CW (Clock wise)
c.CCW (counter Clock wise)
Select one option. Ok we can select CW
We can change the number of times to be rotated from 0 to 3.
Test the movie the object will rotate clock wise three times during its movement across the stage.
2.Group the circle's fill and outline.
Modify-->Group
3.In the timeline insert a keyframe at frame 24
Right click on the time line -->Insert key frame
OR
F6
4.Move the grouped object(Cirlcle) to the right hand side of the stage at frame 24.
5.Now go back to the line and Right Click on any Frame between 1 and 24.
6.Click -->Create Motion Tween.
7.Click on the Rotate options on the properties window
 Here there are three options
a.Auto
b.CW (Clock wise)
c.CCW (counter Clock wise)
Select one option. Ok we can select CW
We can change the number of times to be rotated from 0 to 3.
Test the movie the object will rotate clock wise three times during its movement across the stage.
Sunday, July 25, 2010
Tween Scaling - Motion Tween
Tween scaling will allow us to progressively change the size of our object over the duration of our animation.
1.On the stage draw Circle.
2.Group the circle's fill and outline.
Modify-->Group
3.In the timeline insert a keyframe at frame 24
Right click on the time line -->Insert key frame
OR
F6
4.Move the grouped object(Circle) to the right hand side of the stage at frame 24.
5.Now go back to the line and Right Click on any Frame between 1 and 24.
6.Click -->Create Motion Tween.
7.Select the circle on frame 1
7.Modify--Transform-->Scale
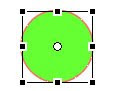
The selected object will now have a dotted box around it.Grab the lower right hand corner handle use it to decrease the object size .
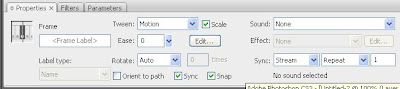
8.In the properties panel select the scale check box.
Test the movie.We can see the circle is gradually grow larger from frame 1 to 25 as it passes across the stage.
If we didn't select the scale check box the circle won't grow gradually larger from frame 1 to 24 and then suddenly the will be changed in frame 25.
1.On the stage draw Circle.
2.Group the circle's fill and outline.
Modify-->Group
3.In the timeline insert a keyframe at frame 24
Right click on the time line -->Insert key frame
OR
F6
4.Move the grouped object(Circle) to the right hand side of the stage at frame 24.
5.Now go back to the line and Right Click on any Frame between 1 and 24.
6.Click -->Create Motion Tween.
7.Select the circle on frame 1
7.Modify--Transform-->Scale

The selected object will now have a dotted box around it.Grab the lower right hand corner handle use it to decrease the object size .
8.In the properties panel select the scale check box.

Test the movie.We can see the circle is gradually grow larger from frame 1 to 25 as it passes across the stage.
If we didn't select the scale check box the circle won't grow gradually larger from frame 1 to 24 and then suddenly the will be changed in frame 25.
Wednesday, July 21, 2010
Standard banners sizes
Full Banner 468 x 60

Half Banner 234 x 60

Full Banner with Navigation 392 x 72

Full Banner with Navigation 392 x 72
Vertical Banner 120 x 240

Wide Sky Scrapper 160 x 600

Sky Scrapper 120x600
 Square Button 125 x125

Rectangle Button 180 x 150

Sky Scrapper 120x600
Square Button 125 x125Rectangle Button 180 x 150
Layer Styles in Photoshop

How to go?
1.Click-->Custom Shape tool
Now we can see some changes in our menu bar like this below snapshot.
 2.click-->style
We can see so many style.We can choose what ever we want.
We apply the layer style to layers,text ,shape and custom shape.There are Five views in layer styles.

• Text Only

• Small Thumbnail

• Large Thumbnail

• Small List

• Large List

In addition to the default layer styles shown above, Some other Layer Styles Sets:
• Buttons
• Glass Button Rollovers
• Glass Buttons
• Image Effects
• Text Effects
• Textures
Importing GIFs into Flash - Bitmap Images in Flash
How to place a GIF image into flash ?
1.File-->Import-->Import to stage/Import to Library
If we import an animated gif image the timeline will be changed.Each of the keyframes reproduces each of the GIF frames as bitmaps within that frame.We cant see the changes while importing non animated gif image.

Each of the keyframes reproduces each of the GIF frames as bitmaps within that frame.
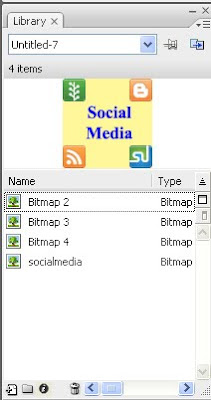 We cant see the changes while importing non animated gif image.
Tuesday, July 20, 2010
Optimizing Bitmaps - Bitmap Images in Flash
Optimizing minimizes the amount of corners in an image and smoothes out the lines to give a smaller but less precise picture.
1. Import the Bitmap image on the stage
File-->Import -->Import to a stage
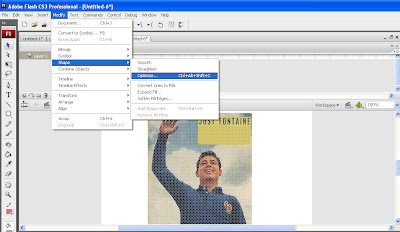
2.Modify-->BreakApart
3.Modify-->Shape-->Optimize
We can get this dialog box
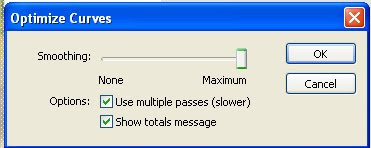 4.Change the settings and then click OK.We can get this report.

1. Import the Bitmap image on the stage
File-->Import -->Import to a stage
2.Modify-->BreakApart
3.Modify-->Shape-->Optimize

We can get this dialog box
 4.Change the settings and then click OK.We can get this report.
Tracing Bitmaps-Bitmap images in flash
Tracing a bitmap converts it from a bitmap image into a series of vectors.
1. Import the Bitmap image on the stage
File-->Import -->Import to a stage
2.Modify-->Trace Bitmap
We can get this dialog box
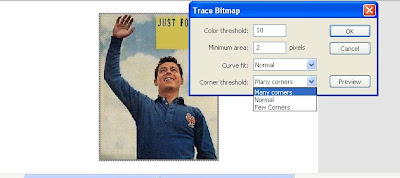 3.Change the settings as per our requirement and click ok.
Now our bitmap image is traced.
Color Threshold:
It is similar to Magic wand properties box.A higher number means that our final image will decompose into fewer vector shapes.
Minimum Area:
It defines the minimum size that an area can be.
Curve Fit:
This is similar to smoothing in the Magic Wand properties box.Resulting traced curves will similar to original bitmap.
Corner Threshold:
This performs the same task as Curve Fit.
Bitmap Images in Flash
Vector Graphics:
Vector graphics are made up of lines and curves.It is resolution independent.
Bitmap image:
Bitmap image is technically called as raster images.It uses rectangular grid of fixels to represent an image.Each pixel is assigned in a specific location and color value.When working with the bitmap,we are editing pixels rather than objects or shape.Bitmap images resolution dependent.They contain a fixed number of pixels.it requires a large amount of storage space.
Using Bitmaps as Fills
Tracing Bitmaps
Optimizing Bitmaps
Importing GIFs into Flash
Motion Guide - Flash Animation
Motion guide is basically a path we draw for an object to follow during a motion tween.
We can link multiple layers to a motion guide layer to have multiple objects follow the same path.
We can link multiple layers to a motion guide layer to have multiple objects follow the same path.
Shape Hint - Flash animation
We can have shape hints to determine how our objects will 'morph' from one to another.
Shape tweening - Flash Animation
In shape tweening, we can draw a shape at one specific time, and change that shape or draw another shape at another specific time.Shape tweens operate on Lines and Fills rather than the grouped shapes and symbols.
Unlike motion tweens, shape tweens can only be performed on non-grouped shapes, or: shapes that have not been converted to symbols.
Unlike motion tweens, shape tweens can only be performed on non-grouped shapes, or: shapes that have not been converted to symbols.
Monday, July 19, 2010
Motion Tweening - Flash animation
In motion tweening, we define properties such as position, size, and rotation for an instance, group, or text block at one specific time, and change those properties at another specific time.We can use motion paths to guide the objects and onion skins to see multiple frames in the animation.
How to do Motion Tweening?
1.On the stage draw circle.
2.Group the circle's fill and outline.
Modify-->Group
3.In the timeline insert a keyframe at frame 24
Right click on the time line -->Insert key frame
OR
F6
4.Move the grouped object(Cirlcle) to the right hand side of the stage at frame 24.
5.Now go back to the line and Right Click on any Frame between 1 and 24.
6.Click -->Create Motion Tween.
Now we can see an arrow headed line from frame 1 to 25 and colored in the frames.
 Here the tweened frames are colored blue to indicate a motion tween.
Motion tween is created.
Now test the movie.We can see the object is moving from left to right.
How to do Motion Tweening?
1.On the stage draw circle.

2.Group the circle's fill and outline.
Modify-->Group

3.In the timeline insert a keyframe at frame 24
Right click on the time line -->Insert key frame
OR
F6

4.Move the grouped object(Cirlcle) to the right hand side of the stage at frame 24.

5.Now go back to the line and Right Click on any Frame between 1 and 24.
6.Click -->Create Motion Tween.

Now we can see an arrow headed line from frame 1 to 25 and colored in the frames.
 Here the tweened frames are colored blue to indicate a motion tween.
Motion tween is created.
Now test the movie.We can see the object is moving from left to right.
Tweening - Flash animation
The term "Tweening" is derived from "in between".
Tweened animations are those where the user defines the starting and ending frames (keyframes) and Flash generates the content for the frames in between.There are really two different types of animation in flash.They are
1.Motion Tweening :
Motion Tweening is moving an object from point A on the stage to point B on the stage.
We can alter objects as they move.We can fade them into the background,change their tint,and scale and rotate them.
How to do Motion Tweening?
How to progressively change the size of our object over the duration of our animation?(Scaling)
How to Rotate the object during motion tween?(Rotate)
How to apply Easing ?
How to create Motion Tweening Effect - Fading with Alpha?
Motion Guide:
It's used to guide the objects.
2.Shape Tweening:
Shape tweening is morphing shapes into something new,rich and strange ,either standing still or moving around.
Shape Hints:
shape hints give us a fine degree of control over the way that a shape tween will work.
Friday, July 9, 2010
Movie Clip Symbols - Flash symbols
Movie clip symbol is an independent,self-contained movie component.Like the button symbol, a movie clip symbol has its own internal timeline.The simplest explanation of movie clip is "a movie with in a movie".Movie clip can be very complicated thing,containing all manner of actions and animations.
Button Symbols - Flash Symbols
Buttons are essential features of any interactive web site.They are the key to any good menu or site navigation interface.Button symbols have a standard four-frame internal timeline.This timeline encode the different button states.
CREATING A BUTTON
1. Choose Insert->New Symbol in the menu (Or press Ctrl-F8)
and the Symbol Properties Box appears.
2.Add a name for our button
3.Click the Button option
4.Click OK and the button editor opens.
5. We can see four frames in the timeline.
6.Draw a circle the active frame is labeled "Up" in the timeline.
7. Insert a key frame in the frame labeled "Over" in the timeline.
a.Enter F6 for inserting a key frame.
b.Open the Fill color palette from the Tool box and select a different color from the original
button color.
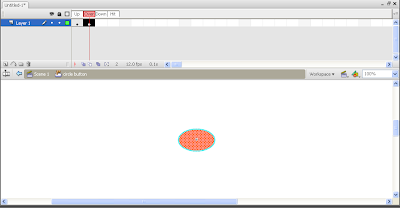
8.Insert a key frame in the frame labeled "Down" in the timeline.
a.Enter F6 for inserting a key frame.
b.Open the Fill color palette from the Tool box and select a different color from the original
button color.
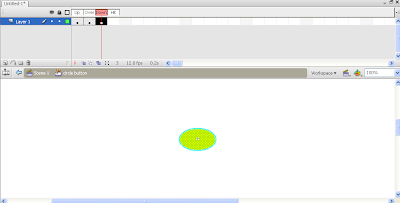
We have created a button with three looks that will change upon mouse events.
Button states:
CREATING A BUTTON
1. Choose Insert->New Symbol in the menu (Or press Ctrl-F8)
and the Symbol Properties Box appears.
2.Add a name for our button
3.Click the Button option
4.Click OK and the button editor opens.
5. We can see four frames in the timeline.

6.Draw a circle the active frame is labeled "Up" in the timeline.

7. Insert a key frame in the frame labeled "Over" in the timeline.
a.Enter F6 for inserting a key frame.
b.Open the Fill color palette from the Tool box and select a different color from the original
button color.

8.Insert a key frame in the frame labeled "Down" in the timeline.
a.Enter F6 for inserting a key frame.
b.Open the Fill color palette from the Tool box and select a different color from the original
button color.

We have created a button with three looks that will change upon mouse events.
Button states:
- Up State
- Over State
- Down State
- Hit State
Graphic symbols- Flash symbols
A graphic symbol is a symbol whose content remains static.Graphic symbols are not as feature-rich as button or movie clip symbols.
How to create a Graphic Symbol?
1.Choose Insert->New Symbol in the menu (Or press Ctrl-F8)
and the Symbol Properties Box appears.
2.Add a name for our graphic sybmol
3.Click the Graphic option
 4.Click OK and the edit view opens.
How to create a Graphic Symbol?
1.Choose Insert->New Symbol in the menu (Or press Ctrl-F8)
and the Symbol Properties Box appears.
2.Add a name for our graphic sybmol
3.Click the Graphic option
 4.Click OK and the edit view opens.
Flash - Symbols
Symbols are self-contained pieces of movie content that we can create once and then use many times in our movies.Symbols have their own"internal timeline", which allows them to work independently from the main movie's timeline.
If we create a copy of symbol on the stage,it's called instance.
Symbols are stored in a library,and we can organize the library and use it to share symbols between different movies.
Types of symbols:
Symbols are created by two alternative methods.
If we create a copy of symbol on the stage,it's called instance.
Symbols are stored in a library,and we can organize the library and use it to share symbols between different movies.
Types of symbols:
Symbols are created by two alternative methods.
- Converting an existing drawing or other object
- Creating a new symbol from scratch
Wednesday, July 7, 2010
Flash Essentials

Stage:
This is the place where we can create movie.
How to change the background color of the Stage?
Work Area:
The work area surrounds the stage.We can place content in the work area.But what are all the contents are placed on the stage only visible in the finished movie.
Timeline:
Timeline is one of the important parts of the flash interface.
Timeline gives you compete control over the length of the movie and its speed.
Frame:
These are essential for creating and arranging the content of our movie.We can see the timeline is divided into numbered segments.Each segment is consisting of groups of four white rectangles which are all separated by by single gray rectangle.
Each of these little boxes represents a frame.The length of the movie determined by the number of frames.
Layers:
Each new flash movie comes with a single layer by default.It's good practice to keep each element of our movie on a separate layer for ease of editing and for neatness.
Layers make movies easier to alter.The content of different layers is independent and portable.
Scene:
Scenes are used to organize our movie into sections.
Tuesday, July 6, 2010
Text Tool ( T ) - Flash Tools

Text Tool is used to place a text.
How to use the text tool?
1.Select the text tool
2.A small box appears with a blinking cursor at the text insertion point.
3.In the character panel choose a font that we like.
4.Using the Font Size slider fix the font size.
5.Set the color for our font.
6.Type the text.
Properties of the text tool
Orientation of Text :
Vertical
Vertical,Left to Right
Vertical,right to Left
Horizontal
Horizontal,Left to Right
Horizontal,right to Left
URL:
We can give URL link to our text.In the first box we have to give the URL.In the target option we have four options.We have to select which one is suitable for us.
Target options:
- _self : Opens the URL in the current window.
- _blank : Opens the URL i na new window.
- _parent : Opens the URL in the parent frame .
- _top : Opens the page in the current window.
1.Bold
2.Italic
Kern:
Kerning is the gap left between pairs of characters.
Alignment:
1.Left
2.Right
3.Center
4.Justified
Character position:
Here three types are there.
1.Normal
2. Superscript
3. Subscript
Pencil Tool ( Y ) - Flash Tools

The Pencil tool is used to draw free-form lines.
How to use the Pencil Tool?
1.Select the tool
2.Drag on the Stage to draw with the Pencil tool.
 Pencil Modes :
we can apply smoothing or straightening to the lines by setting a Pencil mode.
1.Straighten
In this mode the tool will automatically complete simple shapes that we draw.For example if we draw a rough circle it will convert it to a perfect circle.
2.Smooth
In this mode the tool will give some touch up to the lines and make them good.
3.Lnk
If we draw something on the screen the outcome also exactly same as we drew it.

Using the Stroke panel we can change the Stroke Width ,Style and Color.
Subscribe to:
Posts (Atom)